RM1,500 Mechanical Keyboard Assembly – NovelKeys NK65 & C3 Tangerine V2
Andrew Cheng
There are plenty of mechanical keyboards in the market now, but to some folks, these pre-built keyboards leave much to be desired. To achieve the best typing experience, many turn to building a custom mechanical keyboard to suit their needs. This piqued my interest: how much better can these “bespoke” keyboards be?
To find out just what the fuss is all about, I decided to get the parts necessary to build my own custom mechanical keyboard. Before I know it, I already spent (approximately) RM1,500 in this endeavour. Is it worth spending that much money on “just” a keyboard? After putting together my own board, it’s a resounding yes.
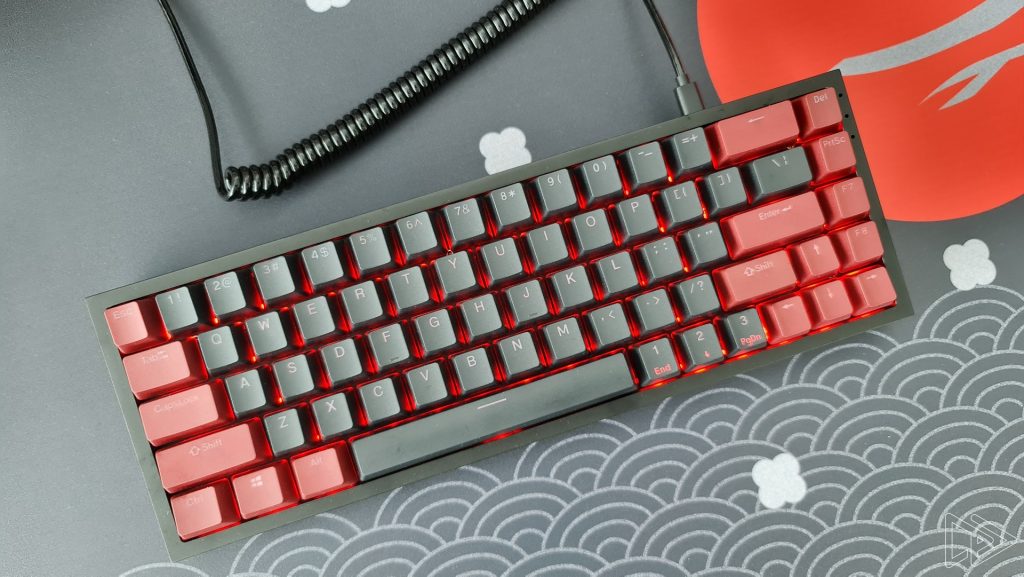
First, let’s break down the parts that I purchased. The first thing I got is the NovelKeys NK65 v2 Aluminium Edition, a 65% keyboard with a hotswap PCB. It retails for $185, which comes up to about RM765. However, to get it shipped to me here in Malaysia, I paid an additional RM150. Why did it cost so much? Well, it’s a heavy keyboard (it weighs around 1.2kg) made out of solid aluminium.
Anyway, that brings the cost to around RM900. Since the NK65 comes with an aluminium case, plate, and a hotswap PCB, all I need are switches and a keycap set to complete my build. For the switch, I got the C3 Tangerine V2 linear switches from a local retailer, Keys. Even though I only need exactly 68 switches to populate the NK65, I got 80 of them…just to be safe. Combined with shipping cost, I paid a total of RM250 for the Tangerine V2.

Next, I needed to get a keycap set. I actually joined the group buy for the GMK MiTo Laser set on Drop, but that will only be shipped later this year in December. Of course, being the impatient person that I am, I got the Drop Skylight keycap set in the meantime, which retails at $45 (approximately RM185). To get it shipped to Malaysia, it cost me a total of about RM250.
So that brings up my total expenditure to RM1,400; where’s the other RM100? Enter the Deskeys switch films and Krytox GPL 205 Grade 0 lube. The switch films are to be installed in the Tangerine V2 switches to make them quieter and reduce stem wobble for a more “stable” typing experience, while the lube – also for the switches – will make them even quieter and smoother.
Besides that, I can also use the lube to tune the stabilisers found in longer keys like the shift, enter, and spacebar. By lubing them (properly), any wire rattle can be eliminated, further improving the typing experience.

It took me almost a month to secure all of these parts, which is actually quite normal in this hobby. Certain items, such as the NK65 and Tangerine V2 switch, sell out very fast the moment they are in stock. Basically, I needed some careful planning, a bit of luck, and a lot of patience to grab them. Now then, let’s get to the assembly.
Thanks to the hotswap PCB of the NK65, all I needed to do was to insert the Tangerine V2 switches into the appropriate slot, and…that’s it. Absolutely no soldering is required to make the switch work, which is the beauty of hotswap boards. Once I’ve completed this, all that’s left is to install the keycaps.
And that’s it. I’ve got a working keyboard. Doesn’t sound very hard, does it?

But assembling the parts was really only half of the work. Completely stock, I thought my custom keyboard was already good enough, but there’s actually still a lot of room for improvement. In the video of my build above, I haven’t lubed or filmed the switches yet, and the stabilisers were not tuned at all.
Fast forward to today, I’ve done all of that, and I’m amazed how much better the keyboard is now. In fact, it feels and sounds like a completely different keyboard from the video above; we’ll do another sound test in a separate video soon to show just how much of a difference it is.

To bring up the question again: is it worth it to spend so much money on a custom mechanical keyboard, and then go through the trouble of assembling, lubing, and tuning it? To me, it absolutely is. In my line of work, I spend a lot of time in front of a computer typing away, and doing that with a personalised, refined keyboard that I spent so much effort on feels…very rewarding.
Plus, no pre-built keyboard offers the level of customisability I got with this keyboard. I can choose the exact design I want, the keycap set I like, and perhaps most importantly, a ton of switch options to choose from; switches that are not offered on off-the-shelf keyboards. This reason alone makes it worthwhile to build a custom mechanical keyboard.

Plus, it doesn’t have to cost as much as it did for me to start getting into this hobby. NovelKeys’ NK65 Milkshake Edition, for one, offers exactly what you need to get started. A hotswap PCB, one of the best linear switches in the market, and a set of dye-sublimated PBT keycaps for only $230 (around RM945) – shipping cost to Malaysia included.
If you want the best typing experience, customisability, and access to a slew of switch options, consider getting into the custom mechanical keyboard scene. It takes quite a bit of work and research, but once you start typing on the finished product, it’ll be well worth it.